
I have taken her out twice now, and I have had the most interesting inquiries. Everyone loves the fabric, and the wood handles-which I’ll admit was a little different for me at first, but I love how it adds a different element to an outfit.
This project is perfect for that bit of fabric you love and can’t let go of.

There of course are different styles you could go with this, depending on the kind of handle you use, but for simplicity sake I will just show how to make this style. You can easily adapt it for any handles!
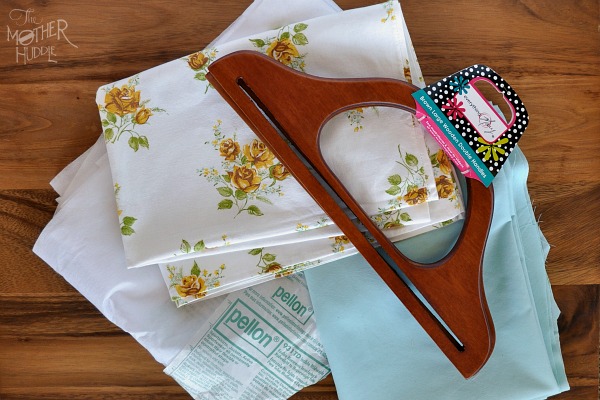
Supplies:
pair of wood purse handles ( I bought mine at Joann Fabric)
medium weight fusible pellon (fusible interfacing)
fabric for lining and body
needle and thread (I used button thread as it’s a little thicker)
all your sewing stuff
Fabric Cuts:
~One 20 x 27 inch piece from the body fabric, which will be the fabric that shows – one piece of pellon cut the same size
~Two 20 x 13¾ inch pieces for the lining – two pieces of pellon cut the same size
Instructions:
We will use a 1/4 inch seam allowance (you can generally use the side of your foot as a guide) throughout unless noted.
Start by ironing the pellon to the same size pieces per manufactures instructions.

Starting with the outside body of the bag – fold in half so that the 20 inch sides line up at the top. Measure down both sides 5½ inches and mark with a pencil or fabric marker.

Now sew both sides from that mark down as shown in the picture.

Next take the lining and measure down 5½ inches as you did on the body, then sew with the right sides together down each side from that point and the bottom, leaving a 4 inch opening in the center.
Press all seams open, or to one side.

Now we’ll sew the corners creating the box shape for the bottom of the bag. With right sides in, stand the bag up and press down the corners so that they lie flat and the side seam is centered.
Measure two inches from the point in, and mark straight across as shown.

Here is a birds eye view of how that should look. Repeat on the other side and then using a regular straight stitch sew along both lines.

Then trim off the corners.
Repeat on the lining, still leaving the unstitched portion of the bottom open.

Now turn the body of the bag right side out, and tuck inside the lining so that the right sides are together.

Each side will have it’s own flap – this is the flap that you will pull through the wood handle. So take the top of the lining and body on one side and sew around the perimeter of the flap, starting and stopping at the point that you sewed on the body. Then repeat on the other side.

Now you will have an enclosed flap on each side. You can see how I just sewed right to the stitches from sewing the body portion.

Now pull right side out through the opening in the lining and sew the opening closed. Turn out the corners, and iron so they are nice and crisp.

To reinforce the opening on the bag, I did a few passes of stitching right at the corner. That way when you open the bag it doesn’t want to tear the stitching on the seams.

Now we just have to sew the bag to the handles. Making sure that the wrong side of the handle is facing in, pull one side through a handle about 1½ inches.

Take your tread and double up with a knot at the end. Give yourself plenty of thread to work with, and starting at one side hand sew a whipstitch to connect the top of the flap to the lining. I just made sure to pull the lining from the body as I went as I only wanted to sew to the lining. If you catch the outside fabric too, that’s okay.

Hand sew all the way down, and then repeat on the other side. I happen to love handwork, give me an audiobook and I could do it for hours! This took about a half an hour for me.

Then I adjusted the gathering to make them look more like pleats. That’s it! Pretty easy, right?
I really do love mine, it’s a one-of-a-kind, and I get to see that vintage fabric all the time now, and not just folded up in my cupboard. Do you have fabric like that, just waiting for the right project to come along?


I have everything to make this bag but the directions confuse me, especially since I am using patterned fabric that must be 'right side up' due to the design. Is there a video?
ReplyDelete