Before I start talking about the finishing of a pillow I think it's a good idea to start with the front of the pillow. This is the most important piece, it's the side you'll look at after all. If you were going to plant a tree in your yard, you'd make sure the ground was properly prepared first, right? Well, that's what you need to do here. A pillow might be a nice quick project, but there's nothing wrong in making sure you have the best foundations before you start.
Or you have specifically made yourself a perfect pillow front, and you need to turn it into something quilted and ready to add a back to.
My ingredients list for a great pillow front are as follows;
- fusible fleece - whether it's pellon, vilene, or heat n bond (or any other make that I haven't used) this stuff is amazing for pillows. It's a polyester fleece, so it doesn't shrink - which is great for pillows because although a quilt looks beautiful all wrinkled up and vintagey with a shrink on the first wash, a pillow can just look like it needs a good press when it's wrinkled.
On one side of the fleece there's a fusible resin (it feels rough) that when pressed adheres to the fabric and means you don't need to baste. It's a permanent fix (the resin doesn't wash out) - so it also means you don't have to quilt as heavily (if at all) if you prefer. It adds body without being stiff. I also don't use a lining inside my pillows when I'm using fusible fleece - that might be a little lazy, but the fleece side of the fusible fleece works a treat - it doesn't pill or go tatty in the wash.
If you don't have any fusible fleece or you would prefer to use some batting, a low or mid loft batting is best. Something reasonably thin and lightweight. I use cotton battings in my quilts, so that's what I have on hand at home and that'll be what I use in my pillows if I don't have time to wait for the post to bring me more fusible fleece.
It will shrink, so I do find I'm pressing my pillows quite well after I wash them. If I was shopping for batting specifically I would buy a cotton/poly mix or a poly like this pellon legacy batting below or quilter's dream (select weight is classed as mid loft, but it's still nice and thin, like a 1/8" loft).
505 spray baste. If you don't have any of this or have never used it before, then go out right now and buy some. I struggle with spray basting quilts bigger than baby size, that is probably more to do with the cats and the dog trying to get in on the action, but for pillows it's amazing.
You simple lay the backing (lining) on the floor (you need a tiled floor, or do it outside - not on carpet or polished wood), lay the batting and the pillow front on top (like a regular quilt sandwich) and fold half of the pillow front and batting up out of the way.
Spray, then gently smooth the folded bits back down, spin around and do the other side. Then repeat for the patchwork top/pillow front - fold back halfway, spray, fold back down and smooth, spin round and do the other side.
Frixion pens for marking quilting lines (available at staples and other stationary stores for less than you'll find them at quilt stores, often on sale and in multi packs with multiple colours). Whether I use spray baste and regular batting, or fusible fleece, I mark my pillows for quilting after I've basted.
If I was to use pins, I'd do it before. I am pretty crappy at quilting, I don't enjoy it much and I cannot for the life of me free motion quilt to a standard that I am happy with, so I quilt straight lines. Sometimes I like the lines to be a little more 'organic' and wonky, but I always start with a few marked guidelines, to help me out. The frixion pen ink disappears when you iron it. Completely.
Some people mention a faint ghost line remaining, I have tried pretty much every colour and on every colour of fabric and I've never once had a problem with that. I'm not saying it doesn't happen - I'm just saying I've never experienced it so I can't show you an example. I do, however, test on my fabrics before using them - just to be safe.
A good quality thread for quilting. For pillows I like quite dense quilting. It help give the pillow a more structured look and they sit up better with a lot of quilting. I use aurifil 50 wt cotton thread (the orange spool), because that's what I use for everything - hand piecing, machine piecing and machine quilting.
I'm not bothered about having a whole selection of different weight threads for different projects, I just want a thread I know my machine likes and I can rely on to work. 50 wt is a really fine thread and you don't see the stitches as heavily as you would if you used a heavier thread. You see the quilting texture instead. For me and my not so great quilting skills, this works best.
If I was better at quilting maybe I'd like to see my stitches more? (US stockists include pink castle fabrics and fat quarter shop and UK stockists include the village haberdashery and m is for make)
I'll be showing you how I make an envelope back, which is the simplest of all the ways to finish your pillow but is the way I use more than any other. Partly because it's so fast, and partly because it's so easy (I'm all for the easy life).
step 1;
Take 2 pieces of fabric that are the same size - each being about 3/4 of the height of the pillow top, and about an inch wider either side
You can see the size reference here - it overlaps about an inch either side and also along the bottom. This is so that when you're sewing the layers together any shifting can be taken into account and fixed within that extra inch.
Using a rotary cutter straighten one long side of each piece of fabric, and fold up twice to make a hem - I use about 3/4" to 1" for my hem - I eyeball it, so it's never very precise (see how one hem is a little bit bigger than the other here? It's ok. It's not a pair of pants so it doesn't matter). Press well and pin.
Sew close to the edge of each hem. I like to lengthen my stitch a little usually, no reason other than I like how it looks with a slightly longer stitch.
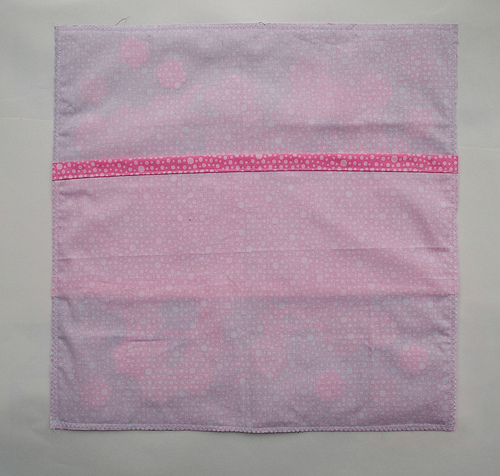
Lay your pillow top right side facing up with what will be the top of the envelope opening on top - right side facing down (so the RIGHT SIDES ARE TOGETHER), making sure it is nice and straight and with the hemmed edge pointing towards the bottom of the pillow. Lay the second piece of envelope back on top of this, right sides facing down, and with the hemmed edge pointing towards the top of the pillow (I've flipped a little corner back in the picture so you can see the overlap here)
Pop a pin at each side of the sandwich in the hemmed part of the bottom envelope piece.
Flip this over and pin really well all the way around the outside
Using a walking foot or even feed foot on your sewing machine, sew all the way around the perimeter using a generous 1/4" or a 1/2" seam allowance. Trim off the excess fabric.
To make the seam super secure zig zag stitch all the way around, making sure you stay within the seam allowance - don't stitch over the straight stitched line, it'll look messy when you turn your pillow case the right way out.
et voila....
Now flip that pillow case the right way out, and press all over. Pop in a pillow form and you're done.
EDITED TO ADD; Sara left a comment asking about the size of the pillow form. Excellent question! When I'm making a pillow I like it to be really super stuffed so I use a larger pillow form to the size of the pillow cover. eg - this pillow here finishes at 18", and it's stuffed with a 20" form.
We looked at making a pillow with a simple envelope closure, and we're going to do the same - but we're going to try making the envelope back in a slightly different way, and add binding too.
First up go get your quilted pillow top, and cut 2 pieces of fabric that are each about an inch wider than the pillow top, and 1.5 x the height. That's right - 1.5 x the height. Both of them. It does seem to use a lot of fabric, but what you are doing is making a fully lined envelope back, and if you think of it that way it's far less painful! I use a lot of extra wide backing fabrics in my quilts, and the leftovers from making a quilt get used this way.
Fold each of these pieces in half, down the length, wrong sides together and press the fold well.
With the pillow top face down, lay the first of your folded envelope back pieces with the folded edge (hem) pointing towards the top edge of the pillow.
And then lay the second folded back pieces on top, with the fold (hem) pointing towards the bottom edge of the pillow.
Pop a pin either side of the sandwich, in the folded edge/hem and then flip over and pin well all the way around
Using a walking foot or even feed foot sew all the way around the perimeter of the pillow using an ever so slightly scant 1/4"seam allowance.
Trim off the excess fabric.
Now add your binding. Just like you would if you were making a quilt. I have a tutorial here for really simple binding that's perfect if you're new to this binding business.
I always hand stitch my binding to the back of my quilt or pillow. Always. I just prefer it that way.
Here's my finished pillows hanging out with their matching quilt.
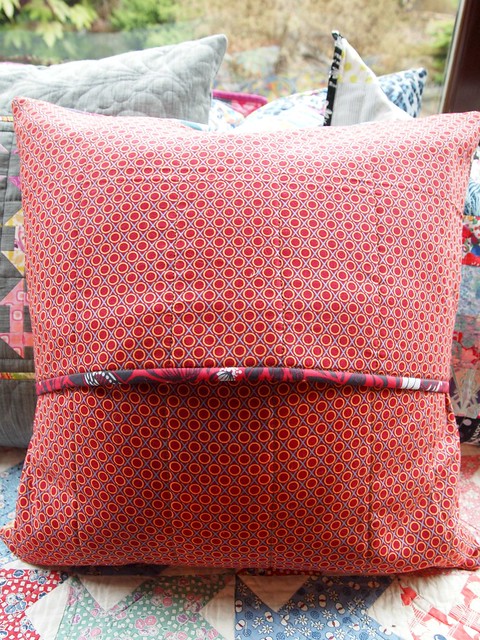
This version is the quilted envelope opening. It's the fanciest looking of the 3 and gives the most professional finish. I chose not to bind mine, but you can bind yours. Just follow the directions.
You will need to cut 2 pieces of lightweight batting (wadding) or fusible fleece (which I prefer) each piece approximately 3/4 of the height of the pillow top, and an 1" larger either side.
You will also need to cut 2 pieces of fabric the same size as the batting/fusible fleece from lining fabric, and 2 pieces the same size as the batting for the outside of the envelope opening. I used the same fabric for these. A non-directional print works best.
Finally you need 2 strips of fabric for binding the edges of the opening, I cut my binding strips 2.5" wide, but you may use narrower. Do what you prefer. Each one should be as long as the width of the batting/fusible fleece (in my case 20" long by 2.5" wide, folded in half and pressed along the length just like regular quilt binding)
Sandwich your lining, batting/fusible fleece and outer fabric just like you would with a quilt. If you are using fusible fleece press to fix the fabric to the fleece. Tip - I find if you layer it up like a quilt sandwich and give it a really good press, the reverse side of the fusible fleece fixes well enough to the lining fabric to work as basting, because I use a hot iron and it probably melts it a little bit. If you use batting, baste with pins or basting spray (how to spray baste can be found in {part 1} here)
Quilt as desired. I am no quilter, so I go for simplicity and evenly spaced straight lines.
Trim off any stray threads and, if necessary, straighten up one of the long sides of each piece and sew on the binding to those edges, just like you would to the edge of a quilt.
Lay your pillow top right side facing up, and the top of the envelope opening right side facing down on top, with the bound edge pointing towards the bottom.
Lay the second piece on top, right side facing down and with the bound edge pointing towards the top of the pillow. Pop a pin in either side of the opening and flip over, pinning all the way around.
Using a generous 1/4" (or, if you can get away with it, a 1/2") seam allowance, sew all the way around the perimeter of the pillow. A walking foot will help sew this evenly and without puckers. Trim off the excess fabric. Finish by zigzag stitching all the way around, making sure you stay within the straight stitched seam.
Flip the right way out, poke the corners out well - use a chopstick if necessary, and give it a good press.
Pop in a pillow form (I use a pillow form the next size up from the size of the pillow case - eg this is an 18" pillow case, so I used a 20" pillow form). I also only ever buy feather pillows because I like the squish you get from a feather pillow (they also make better puppy dog nests for my dog. He likes to squish the pillows down to make a little chihuahua sized dip).
From the back it'll look like this.....
And from the front.....
There you have it!
The zipper. It's the one part of sewing that seems to put the shivers in people. I have to admit I don't like sewing zippers, but they're a necessary evil sometimes, and a zipped pillow opening does look nice.
There's a million different tutorials on inserting zippers into pillows, the ones listed below are ones I've used and work well for me.
"Add a Zipper to Your Pillow Tutorial" (pic below - this is my favourite method for inserting a zipper. It looks so good and it's fancy with that little flappy bit covering the zipper)
Do you want to give it a go with me? What I'm showing today is the most basic way to insert a zipper. It's not the prettiest, but it'll give you the confidence to try something more complicated the next time round.
1. First up, cut a piece of fabric for the back of your pillow about 3/4" to 1" larger than your pillow front all the way round. Turn over one edge 1/2" and press.
2. Your zipper needs to be about an inch longer at either end of your pillow top. I used a 20" zipper for my 18" pillow here. Use a zipper that is a better match than mine - I chose black so you could see what was going on easily. If I was doing this properly I'd have chosen a white zipper. I'd not have chosen one that was so chunky either - zipit on etsy is the place to go for every kind of zipper you'll ever need.
3. Lay your closed zipper with the pull side down onto the right side of the bottom edge of your pillow top. Pin all the way along.
4. Sew into place with a zipper foot. I've adjusted my needle to the far left for a tight fit. You want to sew as close to the zipper teeth as possible. (Use a thread that matches - I've used contrasting so you can see the stitches)
5. Pin the folded edge of the pillow backing to the zipper, just as you did with the pillow front. Sew into place again.
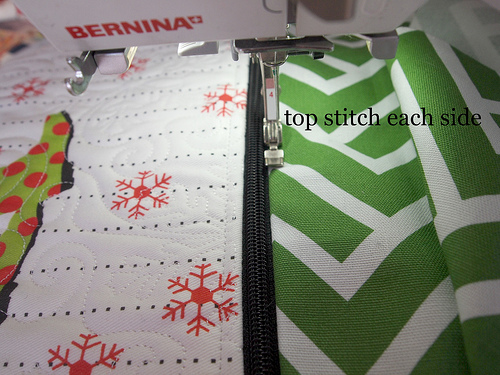
6. Top stitch both sides of the zipper on the right side. This helps prevent the edges of the fabric getting caught in the zipper and gives it a neater look.
7. Unzip your zipper to halfway, and pin the pillow top and the backing right sides together all the way round. Change sewing feet to a walking foot and sew a 1/2" seam around the 3 open edges. Make sure you backstitch a good few times at either end of the zipper.
8. Trim down the excess fabric all the way round and the excess zipper length, and clip corners. Turn right side out and press.
9. Insert a pillow form (this is a 20" form in an 18" pillowcase) and zip up.
Easy right? Now go and try one of the more professional looking methods linked above. Your fear of zippers is gone.
You're welcome.
I hope you enjoyed the how to make a pillow series and it's given you the confidence to try something new in your pillow making!


No comments